
Browned butter sounds more complicated to make than it is because it can go from a lovely golden brown to burnt in the blink of an eye.
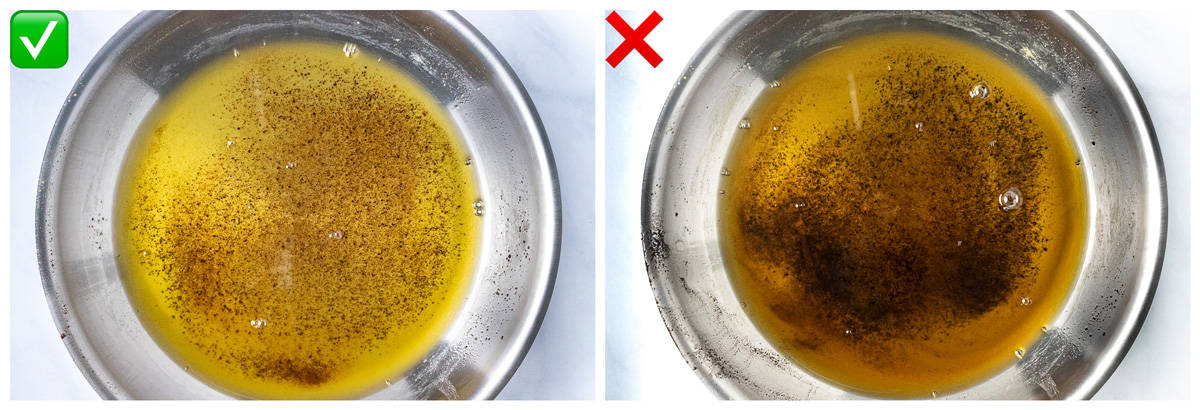
You can tell your browned butter is burnt by using a light colored stainless steel pan to monitor the changing color of the milk solids in the butter. If the color of the solids change from dark brown to black you’ve gone too far. You will also notice a loss of nutty aroma.
While these two indicators are helpful, read on and we’ll show you how to flawlessly know when your brown butter is done so you never burn it again.
How Do You Know If You’ve Burned Brown Butter?
There is a difference between dark-brown butter and burnt butter. Dark-brown butter is the outer limit of browning and has a deep, rich flavor that will make your baked goods taste extra special. Burned brown butter, on the other hand, is black and lacks any nutty aroma. Put simply, it won’t taste good.
As stated above, the two main indicators for determining the brownness of butter and whether you’ve gone too far and burned it are watching the changing color of the milk solids and a change in smell. Let’s look at some tips for how you do that effectively.
How to prevent browned butter from burning
- Use a light colored pan. It’s easier to see the different stages of browning (more on that below) on a light /white surface, such as stainless steel or cast iron enamel rather than the dark surfaces found on most non-stick pans.
- Cook at a low temperature. The best way to monitor the color changes of the milk solids is to use a medium-low temperature, which will also slow down the butter from cooking too fast. This will allow you enough time to stop the butter from browning any further. Once you’ve practiced browning butter a few times at a lower heat, you can gradually increase the temperature to medium / medium-high for faster results. (See our note below if your butter isn’t browning).
- Don’t use salted butter. Browning salted butter has two drawbacks. For one, it foams more than unsalted butter, making it difficult to see the milk solids change color. Secondly, the salt flavor can negate the subtle nutty, caramelized flavor notes you’re trying to accomplish with browning. Since you’ll most likely be using this in another cooking application, you can always add in just the right amount of salt after browning.
- Look through the foam. Sometimes the foam created from water evaporating can make it difficult to see the browning process, even while using unsalted butter. To remedy this, you can take the pan off the heat and swirl the butter until the foam subsides. Swirling the butter helps it melt and makes the milk solids brown more evenly. Once the foam settles you can place the pan back on the heat and continue browning.
- Scrape the bottom of the pan. The milk solids are proteins, and undergo the Maillard reaction to brown. The longer these bits hang out on the bottom of the pan, the easier they can stick and burn. Take a heat resistant silicone spatula and use it to scrape up these solids so that they are moving around and browning evenly. You want to keep scraping, stirring and swirling constantly.
- Use your nose. Browned butter has a fantastic smell akin to toasted nuts or caramel. In fact, the french term for brown butter is beurre noisette, which roughly translates to hazelnut butter. You know when brown butter is done when it has a hazelnut complexion and smells nutty. It shouldn’t smell acrid or smokey. Similarly, brown butter will add a sweet, nutty, caramelized taste to many dishes which we’ll discuss further down.
- Pour into a heatproof bowl. Butter turns from light to dark very quickly so you’ll want to stop it before it goes too far. Simply taking the pan off the heat won’t stop the butter from cooking. When you’ve reached your desired level of brownness, pour it immediately into a heatproof bowl such as tempered glass, not metal. Then, you can either stir with a metal spoon to absorb the heat or add in a tablespoon of cold butter to rapidly cool it down.
Why is the butter not browning?
It’s possible you’ve run into the opposite problem from burning, which is not browning at all. If your butter is not browning, it’s because your temperature is too low, i.e. below boiling point. Raise the heat up to medium and swirl the butter around, this will make the water cook off faster. The water content in butter will boil at 212 ºF and will create foam. Once this foam has evaporated, browning can occur. You can always pull the pan off the heat if you think it’s cooking too rapidly.
Be sure to try our Brown Butter Chocolate Chip Cookies with Coconut and Macadamias after reading this guide!
What Does Brown Butter Look Like?
Brown butter has 3 main stages of browning. Here’s a simple guide to what they look like so that you’ll know exactly when to pull it from the heat before it burns. Each shade of brown butter has a slightly deeper flavor than the next.
Light Golden Brown Butter
At this stage the butter has melted, the foam has cooked off and the milk solids are just beginning to caramelize and develop flavor and a nutty fragrance. This is where you really need to start paying attention because it can rapidly change from this point forward. You could stop here if you’re using this in a simple sauce with few ingredients like a brown butter vinaigrette for salads. Otherwise, keep going.

Dark Golden Brown Butter
At this stage, the milk solids have caramelized half way, but it hasn’t quite reached its peak yet. You can safely stop at this point without any worry of burning the butter, and this would still be ideal for most recipes. However, you can go a step further if you want to intensify the flavor to the max. The next stage is where it gets tricky.

Dark Brown Butter
This is the end of the line, where the butter has reached its most intense and noticeable flavor. There’s a thin line between this stage and burnt. You should definitely take the butter off the heat at this stage so it can start cooling down.

Burned Brown Butter
Now that you’ve seen the three main stages, let’s talk about the point of no return, burnt. The butter doesn’t have to be smoking in order to burn it. Since the majority of flavor is contained within the milk solids, having burnt milk solids means the nutty aromatics and caramelization are now gone, and you’ve gone too far.
You can attempt to strain out and filter these burnt bits using a coffee filter or try skimming them with a large spoon and have a brown clarified butter. However, these methods are messy and difficult. Quite frankly, you’re probably better off to start over.
After all, store brand butter is fairly inexpensive, and you’re most likely going to be using it in a recipe. It’s far better to start over at this point than to make a batch of cookies or a pasta sauce and realize it tastes off.

Basic Steps for Browning Butter
- Cut butter (at least 1 stick) into equal tablespoon sized pieces so that they melt at the same rate.
- Heat over medium-low heat and allow butter to melt
- As butter begins to foam, stir and swirl it until foam subsides.
- Use a silicone spatula to scrape the milk solids from the bottom of the pan.
- When butter has browned to desired shade, pour in a heat proof bowl immediately
- Stir butter with a spoon or add a little cold butter to cool butter down.
What is Brown Butter Used For? Why It’s So Good.
Now that you know how to get the gradation of brown butter you want, what will you use it for? Brown butter adds amazing flavor and richness to many foods, especially baked goods and pasta.
But you can also use it on so much more. You can substitute it in most places regular melted butter would be an ingredient. Additionally, brown butter will solidify at room temperature and you can chill it in the refrigerator to serve on bread. While this isn’t an exhaustive list, here are some more ideas you can try.
Cookies and Other Desserts
If you’ve never incorporated brown butter into your cooking before, we highly suggest starting with cookies. The added toffee-like notes will blow your mind, especially when paired with chocolate. You’ll wonder why you haven’t been using it in more recipes. From there, you’ll see how great it works in all kinds of desserts.
- Brown Butter Chocolate Chip Cookies with Coconut and Macadamias
- Graham Cracker Pie Crust
- Brown Sugar Cookies
- Donuts and Glazes
- Blondies
- Cakes and Cake Frosting (i.e. Brown Buttercream)
- Ice Cream
- Bread Pudding
Pasta and Pasta Sauces
What’s better than a plate of fresh pasta? A rich brown butter sauce to to top it with.
- Brown Butter and Sage Sauce
- Parmesan and Brown Butter Sauce
- Butternut Squash Ravioli
- Gnocchi
Breads
- Banana Bread
- Sandwich Bread
- Soda Bread
- Babka
Vegetables
- Brown Butter Vinaigrette
- Onions
- Roasted Cauliflower
Meats and Seafood
- Garlic Brown Butter Beef Tenderloin
- Pork chops with a Brown Butter Sage Sauce
- Sole Meuniere
- Brown Butter Crab Cakes
Leave a Reply