
Wood cutting boards are fantastic for prepping your recipes. However, they do require some maintenance to stay in great shape. Fortunately, the process for cleaning, seasoning and restoring your wood cutting board is quite simple. We’ve found some great methods we hope are helpful to you.
To disinfect your cutting board we recommend using mild antibacterial dish soap, warm water and a scrub brush. To further clean and deodorize your board you have even more options. For tough odors you can spray vinegar on your board. You can also get rid of stains and smells with either a combination of lemon and coarse salt or baking soda and vinegar. After cleaning, you’re going to want to season the board with a food-grade mineral oil, or a combination of beeswax and mineral oil to seal it, once a month. If your board is showing rough edges or serious wear from knife cuts, you can use sandpaper to easily restore it.
DISINFECTING AND CLEANING YOUR WOOD CUTTING BOARD

You’ll want to clean your wood cutting board as soon as possible to prevent bacteria from growing on and into it. You don’t want to leave excess water and juices laying around on the surface for a long time as this can leach into the board and create a breeding ground.
Soap and water
When to use it: This method will be fine for most everyday cleaning and disinfecting. We definitely recommend using soap and water if you use your board to cut meat. The only caveat is that the soap will eventually strip the oils out of the wood that are keeping bacteria from leaching into the board. We discuss how to reseason your board with oil below.
How to use it: The first rule when using this method is to NEVER submerge your wood cutting board under water or put it in the dishwasher. Wood is porous and will absorb the water, which will warp and crack your board.
- Stand your board on end in a clean sink and run warm water down the surface of one side. If your faucet has a sprayer feature it will work great for this.
- Apply a few drops of mild antibacterial dish soap detergent to the board and work it over the entire surface with a scrub brush. Rinse the soap off with more warm water and repeat on all surfaces of the board.
- Take a dry towel or dish cloth and while applying firm pressure, push any excess water off the board.
- Place the board on a wire rack so that it can dry on all sides.
White distilled vinegar

When to use it: This method is great at getting out strong stubborn odors, such as onions and garlic and can be useful for breaking up grime. It’s biodegradable so the vinegar smell won’t stay on the board.
Vinegar can also be effective at killing some foodborne illnesses such as E coli, salmonella and listeria, but it cannot kill everything. More info about that here.
How to use it: Only use white distilled vinegar. It’s best to use a spray bottle to lightly apply the vinegar on the board. Let the vinegar sit on the surface for a few minutes and then wipe off with a moist towel. Allow to air dry on a wire rack.
Lemon juice and coarse salt:

When to use it: This is by far the best smelling method. The acid of the lemon juice will neutralize odors and you’re left with the fresh scent of citrus. It’s great for lightening stains and the salt works as an abrasive to help lift stains.
How to use it:
- Cut a lemon in half and sprinkle a light layer of coarse salt, such as kosher, on top of the board.
- Squeeze a little bit of the lemon juice from one of the halves on to the board. Use the lemon halve as a scrubber to work the juice and the salt into the board.
- Let it stand for about 5 minutes.
- Use a bench scraper to scrape off the salt and lemon juice, then wipe off with a moist towel and allow to air dry on a wire rack.
Baking soda and vinegar:
When to use it: If you have some really tough stains from things like beet juice or meat juices and the lemon juice didn’t work, you can try this.
How to use it: Sprinkle some baking soda over one side of the board, enough to lightly cover it. Using a spray bottle, spray vinegar over the baking soda and let it sit for atleast 5 minutes. Use a scrub brush to work the mixture into the board. Rinse with warm water and then wipe off with a dry towel. Allow to continue air drying on a wire rack.
DRYING YOUR WOOD CUTTING BOARD

It’s important to allow the board to dry completely before moving on to seasoning it because you don’t want to seal moisture into the board.
As mentioned before, using a wire rack allows the cutting board to dry on all sides and not trap moisture. If this isn’t an option you can stand the board on end on a towel near a wall or another stable structure to prevent the board from tipping over.
SEASONING YOUR WOOD CUTTING BOARD

How often should you season your board?
It’s important to season/oil your cutting board about once a month to prevent the board from drying out and to prevent it from absorbing water that can damage the board.
What is the best oil for cutting boards?
You want to use food grade mineral oil. That means it’s safe for human consumption, unlike mineral oils made to lubricate machinery. Food grade mineral oil is relatively inexpensive and has some anti-microbial properties that will aid in keeping the board food safe.
You can also use a combination of mineral oil and beeswax to make a board conditioning cream, many of which are commercially available, which gives an additional seal as well as a sheen to the wood.
Which oils and cleaners should you not use on your wood cutting board?
These oils, unlike food grade mineral oil, will go rancid:
- Corn oil
- Flax oil
- Olive oil
- Peanut oil
- Sesame oil
- Sunflower oil
- Teak oil
- Walnut oil
- Vegetables oils
These cleaners can disinfect but are harmful if consumed and will dry out your board.
- Alcohol
- All-purpose cleaning solvents
- Undiluted bleach
How do you apply oil to the wood cutting board?

Here’s a simple trick that will keep the oil from getting all over the place, including your hands. Take a clear plastic tall kitchen bag (biodegradable if you can find it) and place the cutting board inside.
Squirt about a tablespoon of mineral oil inside the bag on one side of the board. Use your hands to rub the outside of the bag and work the oil all over and into the board. The clear bag allows you to see any dry spots.
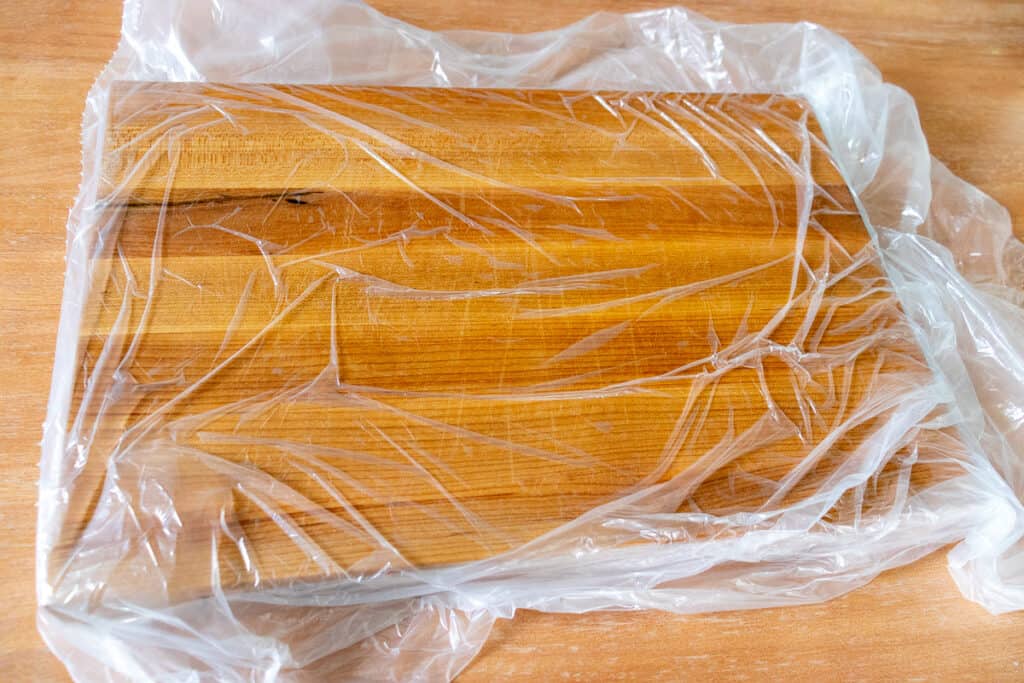
Add more oil as needed until you’ve completely covered the board and no dry spots remain. Don’t worry about over oiling the board; it’s not possible. Let the board sit in the bag for about 8 hours overnight.
The wood will drink the oil until it’s full. Then remove the board from the bag and wipe off any excess oil with a cloth kitchen towel and allow it to air dry on a wire rack. The mineral oil shouldn’t stain the towel.
We don’t recommend using paper towels for this or you’ll wind up with bits of paper towel stuck to the board and that’s not fun to clean. If you desire, you can apply a second coat of the beeswax/mineral oil conditioner cream, using the bag method, for a deeper seal.
RESTORING
After using your cutting board for a long time, it may have developed knicks and cuts that have made the surface uneven. Also, if you’ve washed your wood cutting board recently, you may notice it has developed a rough surface. This is known as grain raising and is caused by the wood swelling, which raises the wood fibers on the surface. You can easily fix this by sanding it down with sandpaper.
What grit sandpaper should you use to restore your cutting board?
You’re going to want to sand the board along the grain one time each with 80-grit (course), 120-grit (medium), and 220-grit (fine) sandpaper. Use a brush to clear away the dust with each pass.
To make the sandpaper easier to grip and protect your hands, you can take a bar of soap or a box of equal size and cut a piece of sandpaper to fit it, then wrap the sandpaper around the bar and sand away.
Once you finish with the 220-grit sandpaper, the cutting board should feel smooth and will have a lighter color. Wipe it down with a damp cloth, and let it dry completely on a wire rack. Once dry, you’ll want to season the board again.
Enjoy your wood cutting board for years to come
If you follow these tips your board should last you a lifetime. Whether you’ve just bought a brand new cutting board or want to bring an old one back to life, taking care of it really takes no time at all. Happy chopping!
Thank you! This article is very helpful!
Thank you!! Great information and lots of options. Good to know about what NOT to do as well. Now I know the right way to go about it with an old board or a brand new one..
It’s never too late. Our cutting board was severely damaged, many knife cuts, splintering, stained, etc. I made several passes with belt sander, coarse then medium belts, then also rotary sander. Final hand sanding with 400 grit. Then two rub-in sessions with Howard Butcher Block Conditioner from Home Depot. It’s just like what you recommend: food grade mineral oil, beeswax, carnauba wax. Result was better than new, like living room furniture. Have since done a maintenance version of this, but any power sander makes it easy and quick to get a mirror smooth surface again. It’s a hardwood, but it has to yield to knives or it will dull them.